Easy Drawings For 8 Year Olds rose is unquestionably the floral representation of love. Although they are beautiful, roses wither over time like all other flowers. Why not get proficient in rose drawing instead? You may always take a rose’s beauty up close and personal with a drawing of one.
Fortunately, we have developed a step-by-step lesson that outlines how to draw a rose in just 9 simple, quick stages. Easy Drawings For 8-Year-Olds instruction is accompanied by a picture that you may use as a visual aid while you complete each step one at a time.
Regardless of your level of drawing ability, you can draw a rose with this tutorial!
Let’s get started learning how to draw a rose!
1:
- On the upper left corner of your paper, begin by drawing an amorphous form with curved lines.
- This is the largest and last visible petal on the rose’s left side.
2:
- Sketch the Rose’s First Two Petals
- We’ll repeat our actions from the previous phase at this point. This time, draw a little petal behind the larger one we previously made.
- If the petals don’t appear to be identical, don’t worry! The petals don’t need to be uniform. The petals appear more realistically unequal the more they are!
3:
- After that, sketch the petal on the back portion.
- We’ll be drawing the inner petal area this time.
- To illustrate this, use curved figures like those in the illustration.
4:
- Next, sketch the center of the rose.
- Since we’ll be drawing portions of the inner and outer petals in this step, it’s like combining the previous steps.
- Draw curved lines to finish the inner petal and a portion of the outer petal.
5:
- Then, in Step 5, add additional petals to the right side.
- This time, we’ll complete the vast outer petal part.
- To depict this, make curved lines similar to the figures.
6:
- Adding Additional Rose Petals to the Back Section
- We will draw another petal to give the flower a “wraparound” appearance. However, only the top portion of this petal would be seen because it is placed at the back.
- Draw a curved line to represent the top edges of the petal to construct it.
7:
- Finish all the rose’s petals
- On the rightmost side of the rose, draw another curved shape representing the final petal.
- This petal should be more bent and curved than the other petals because it is outside the rose.
8:
- Following that, draw the rose’s stem
- The rose is gradually coming together, as we can see now.
- We are going to add the rose stem in this phase. Outline the rose with two curved parallel lines.
9:
- Draw a Leaf on the Right Side of the Page.
- The right side of the rose’s stem will get a single leaf added in this step.
- Draw an asymmetrical shape with a pointy end on the opposite side and a circular edge on the left side to create the leaf. The result is shaped like a single leaf.
- Then, trace a line slightly bent over the leaf’s length. This produces the pattern’s central line on the leaf.
- Then, to complete the various patterns inside the leaf, draw several diagonal lines connecting to the center line.
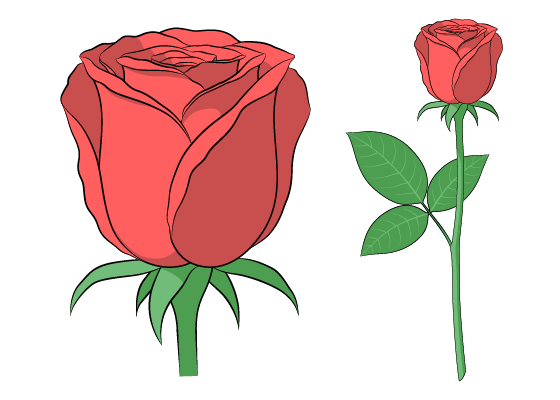
- You’ve sketched a rose successfully, so there! It’s now time to add color to your gorgeous rose!
-
Author Bio
I am Zoya Arya, and I have been working as Content Writer at Rananjay Exports for past 2 years. My expertise lies in researching and writing both technical and fashion content. I have written multiple articles on Gemstone Jewelry like Sterling silver jewelry and other stones over the past years and would love to explore more on the same in future. I hope my work keeps mesmerizing you and helps you in the future.